
The general arrangement and appearance of text in a document is known as ............... .
- Editing
- Formatting
- Appearing
- Mailing
Answer
Formatting
Reason — The general arrangement and appearance of text in a document is known as formatting.
How many types of text formatting do we have in Microsoft Word?
- One
- Two
- Three
- Four
Answer
Three
Reason — There are three types of text formatting in Microsoft Word —
- Character Formatting
- Paragraph Formatting
- Page Formatting
What does this 
- Align Text Left
- Align Center
- Justify
- Align Text Right
Answer
Align Text Right
Reason — This button signifies Align Text Right function.
What does this 
- Align Text Left
- Align Center
- Justify
- Align Text Right
Answer
Justify
Reason — This button signifies Justify function.
What does this 
- Decrease Indent
- Increase Indent
- Justify Indent
- None of these
Answer
Decrease Indent
Reason — This button signifies Decrease Indent function.
Which type of formatting focuses on the appearance of individual character?
- Page
- Character
- Paragraph
- All of these
Answer
Character
Reason — Character formatting focuses on the appearance of individual character. From font sizes to font styles, text positioning to text attributes; the Character Formatting includes all attributes that can be used to define the arrangement of a character.
Under which tab do we have the Font group?
- Home
- Insert
- View
- Mailings
Answer
Home
Reason — Font group is displayed under Home tab.
You can change the color of the text by using the ............... option.
- Font
- Font Effects
- Font Color
- Position
Answer
Font Color
Reason — We can change the color of the text by using the Font Color option.
Which tab contains the Change Case option?
- View
- Insert
- Home
- Mailings
Answer
Home
Reason — Home tab contains the Change Case option.
Which option in Microsoft Word places the selected text below the baseline?
- Superscript
- Subscript
- Script
- Downscript
Answer
Subscript
Reason — Subscript option in Microsoft Word places the selected text below the baseline.
Which of the following option indents all lines other than the first line?
- Bar Tab
- Left Tab
- Hanging Indent
- None of these
Answer
Hanging Indent
Reason — Hanging Indent option indents all lines other than the first line.
What do you call the distance between the written text and the edge of a paper?
- Margin
- Ruler Line
- Alignment
- Indent Stop
Answer
Margin
Reason — The distance between the written text and the edge of the paper is called margin.
There are four categories of Text alignment.
Answer
False
Reason — There are two categories of Text alignment —
- Horizontal Text Alignment
- Vertical Text Alignment
The distance from the written text to the edge of the paper is called Margin.
Answer
True
Reason — The distance between the written text and the edge of the paper is called margin.
Superscript and Subscript are different forms of Text margins.
Answer
False
Reason — Superscript and Subscript are different forms of Font effects.
The default alignment of text in a document is Justified.
Answer
False
Reason — The default alignment of text in a document is Align Text Left.
The Tab Selector is present above the Vertical ruler on the left.
Answer
True
Reason — The Tab Selector is present above the Vertical ruler on the left.
The shortcut to open the Font dialog box is Ctrl + D.
Answer
True
Reason — The shortcut to open the Font dialog box is Ctrl + D.
The Drop cap option is available in the Text group on the Insert tab.
Answer
True
Reason — The Drop cap option is available in the Text group on the Insert tab.
The vertical distance between successive lines of text is called Paragraph Spacing.
Answer
False
Reason — The vertical distance between successive lines of text is called Line Spacing.
The Page tab is used to edit the page settings.
Answer
True
Reason — The Page tab is used to edit the page settings.
You can change the margins of a page by using the Ruler bars.
Answer
True
Reason — You can change the margins of a page by using the Ruler bars.
Define Margins. Explain the different types of margins along with the method used to set them in Microsoft Word.
Answer
The distance between the written text and the edge of the paper is called margin.
There are four types of margins present in Microsoft Word —
- Top Margin — It is the distance between the text and the top edge of the page.
- Bottom Margin — It is the distance between the text and the bottom edge of the page.
- Left Margin — It is the distance between the text and the left edge of the page.
- Right Margin — It is the distance between the text and the right edge of the page.
We can set margins in two ways:
Using the Ruler Bars — To set the left margin, we follow the given steps:
Step 1 — Place the pointer on the indent markers present on the left Horizontal ruler bar.
Step 2 — The pointer changes into double-headed arrow.
Step 3 — Now drag the mouse pointer to the right to increase and to the left to decrease the margin.
Step 4 — After setting the margin, release the mouse button and observe the changes in the left margin setting on the page.
Step 5 — Similarly, we can change the right margin as well as top and bottom margins.Using the Page Setup dialog box —
Step 1 — Select the Page Layout tab.
Step 2 — Click the Margins button in the Page Setup group. A drop-down list of options appears. The 'Normal' option is selected by default.
Step 3 — Select the desired predefined margin from the drop-down list.
Step 4 — We can also select the Custom Margins option from the drop-down list to specify our own margin settings. The Page Setup dialog box will appear.
Step 5 — On the Margins tab, click the increment or decrement buttons next to the Top, Bottom, Left, and Right fields to increase or decrease the margin settings respectively.
Step 6 — In 'Apply to' box, choose any option and click on OK.
What do you understand by text alignment? How many ways are there to align the text?
Answer
Text alignment refers to the positioning of text between the margins of a page. There are two categories of text alignment :
Horizontal Text Alignment — Aligning the text with respect to left and right margins is called Horizontal text alignment. There are four types of horizontal text alignments —
- Align Text Left — This is the default alignment of text in a document. The text is aligned along the left margin while leaving a little space towards the right margin.
- Align Text Right — The text is aligned along the right margin while leaving a little space towards the left margin. This alignment is mostly used to put dates on letterheads.
- Center — The text is aligned centrally between the left and the right margin. It is mostly used for titles.
- Justify — The text is aligned evenly between the left and the right margin.
Vertical Text Alignment — It aligns the text with respect to the top and bottom margins of a page.
What are Header and Footer? How will you insert them in a document?
Answer
Header and Footer are those little identifiers that run across the top and bottom of the document, respectively. They include information like page numbers, date, title of a book/chapters, author's name and slide show theme, etc.
To insert header and footer in our document, we follow the given steps:
Step 1 — The Header and Footer buttons are found in the Header & Footer group on the Insert tab. Click on the Header button.
Step 2 — Select the Edit Header option from the drop-down menu. An additional tab with the name Design appears on the Ribbon.
Step 3 — On top of the page, we find the Header box, which is separated from the rest of the page with a dotted line.
Step 4 — Click in the Header box then type the text one wants on the left side.
Step 5 — Press the Tab key twice. The insertion point will jump to the right side. Click on Date & Time button in the Insert group on the Design tab.
Step 6 — Choose the suitable date and time format in the Date and Time dialog box and click on OK. The date/time now appears in the document accordingly.
Step 7 — Click the Footer button on the Insert tab and select the Edit Footer option. The Footer box will appear at the bottom of the page. We will observe that the insertion point appears on the left side of the Footer box.
Step 8 — Press the Tab key once, the insertion point will jump to the center of the page.
Step 9 — Click the Page Number button in the Header & Footer group on the Design tab and choose the Bottom of Page option from the drop-down list.
Step 10 — We can also select the Format Page Numbers option from the drop-down list. Select the required format from the Page Number Format dialog box. Click on OK.
Step 11 — Click on the Close Header and Footer button on the Design tab to close the Header & Footer tools.
The Header and Footer will be inserted in the document.
Define Indentation. How will you set-up Left and Right Indent in a paragraph?
Answer
The distance between the text boundaries and the page margins is called Indent. The process of setting indents is known as Indentation.
We can follow the given steps to set-up Left and Right Indent in a paragraph —
Step 1 — Click on the Page Layout tab.
Step 2 — Select the text that we would like to indent.
Step 3 — In the Paragraph group, define the Left and Right Indents in their respective text boxes.
How can we use Horizontal Ruler bar to change the indents of a document?
Answer
Indent Markers are present on the Horizontal ruler. We can use Horizontal Ruler bar to change the indents of a document by following the given steps :
Step 1 — Place the insertion point anywhere in the paragraph.
Step 2 — Adjust the first line indent by dragging the First Line Indent marker on the ruler.
Step 3 — To adjust the hanging indent, drag the Hanging Indent marker.
Step 4 — To move both markers at the same time, drag the Left Indent. This will indent all lines in the paragraph.
Which option is used to increase the spacing between two selected words?
Answer
Font size option can be used to increase the spacing between two selected words. It can be achieved by following the below steps:
Step 1 — Select the space character between the two words.
Step 2 — Increase the font size of just the space character setting it to some value higher than the font size of the two words.
Step 2 — Observe the increased spacing between the two selected words.
How to insert page number on every page of a document?
Answer
We can insert page number on every page of a document by using Footer feature of MS Word. There are two ways to add page numbers to a document:
- Click the Page Number button in the Header & Footer group on the Design tab and choose the Bottom of Page option from the drop-down list.
- Select the Format Page Numbers option from the drop-down list. Select the required format from the Page Number Format dialog box. Click on OK.
What is Tab Selector? Explain all the options available in it.
Answer
The Tab Selector is present above the vertical ruler on the left. It is used to define tab text position on the ruler bar that are used to indent a paragraph or a line.
The tab options are as follows:
- First Line Indent — It inserts the indent marker in the ruler and indents the first line of the text in a paragraph away from the left margin.
- Hanging Indent — It inserts the hanging indent marker and indents all lines other than the first line.
- Left Tab — It moves text to the right as we type.
- Center Tab — It centers text according to the tab.
- Right Tab — It moves text to the left as we type.
- Decimal Tab — It vertically aligns the decimal numbers using the decimal point.
- Bar Tab — It draws a vertical dotted line on the document.
Mrs. Vibha, computer teacher, has asked Akhil to change the alignment of a paragraph without using the Paragraph dialog box. How will he complete his assignment?
Answer
Akhil can use the alignment buttons present in the Paragraph group on the Home tab. He can select the paragraph and click on the desired alignment button.
Sanjiv has written a three pages essay on "Army". The teacher wants the Page number, Author's name and Date on every page. What approach will he follow?
Answer
Sanjiv can insert header and footer in his document by using the Header and Footer buttons, found in the Header & Footer group on the Insert tab.
He can follow the given steps:
Step 1 — Click on the Header button in the Header & Footer group on the Insert tab.
Step 2 — Select the Edit Header option from the drop-down menu. An additional tab with the name Design appears on the Ribbon.
Step 3 — On top of the page, we find the Header box, which is separated from the rest of the page with a dotted line.
Step 4 — Click in the Header box then type the author's name on the left side.
Step 5 — Press the Tab key twice. The insertion point will jump to the right side. Click on Date & Time button in the Insert group on the Design tab.
Step 6 — Choose the date format in the Date and Time dialog box and click on OK. The date now appears in the document accordingly.
Step 7 — Click the Footer button on the Insert tab and select the Edit Footer option. The Footer box will appear at the bottom of the page. We will observe that the insertion point appears on the left side of the Footer box.
Step 8 — Press the Tab key once, the insertion point will jump to the center of the page.
Step 9 — Click the Page Number button in the Header & Footer group on the Design tab and choose the Bottom of Page option from the drop-down list.
Step 10 — Click on the Close Header and Footer button on the Design tab to close the Header & Footer tools.
The Header and Footer will be inserted in the document showing author's name, date and page number.
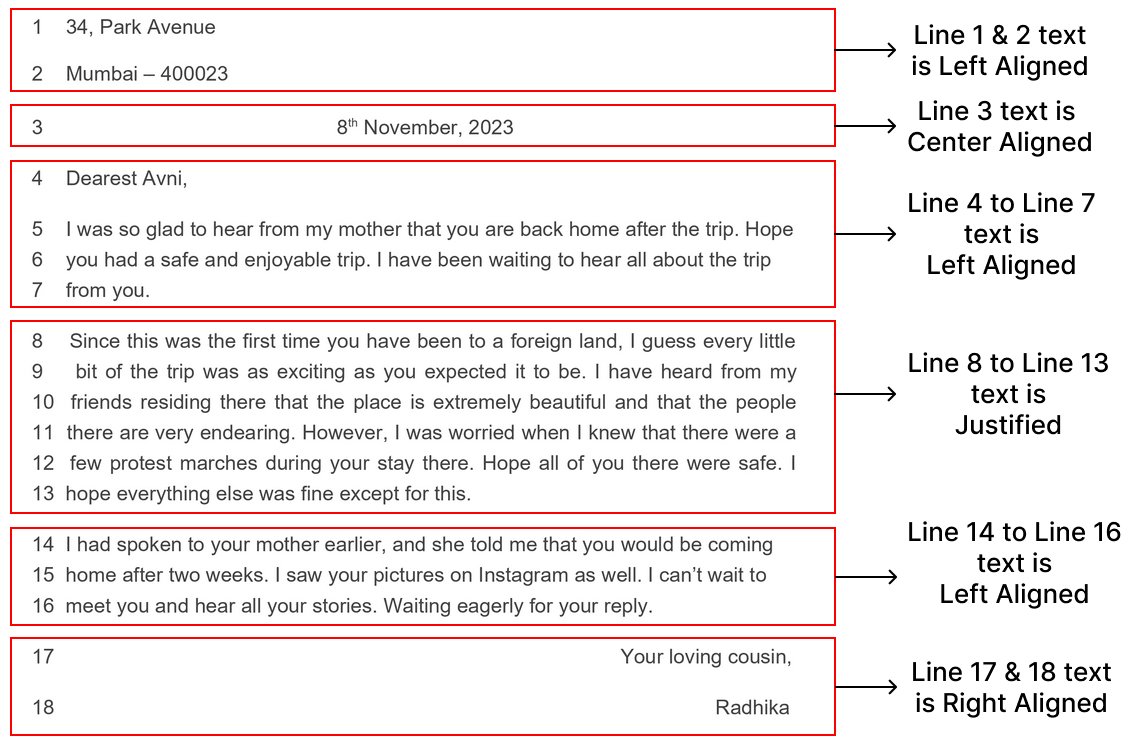
Teacher has asked Juhi to write an informal letter to her friend and mention the type of text alignment used in every line. Help her to complete the assignment.
Answer
The completed letter with text alignment to every lined labelled is given below:
Ricky has learnt to change the indents using the Indents & Spacing tab of Paragraph dialog box. The teacher wants him to do the same task using the Indent markers present on the Horizontal Ruler bar. Help him to finish his assignment.
Answer
The below diagram shows the different indent markers on the Horizontal ruler bar:

Ricky can change the desired indent markers by simply dragging them.
Kabir has written four paragraphs of text. The teacher wants him to use a different color scheme and alignment for each paragraph. How will he do that?
Answer
To change the color scheme for first paragraph, Kabir can follow the steps given below:
Step 1 — Select paragraph 1.
Step 2 — Click on the Font color option available in the Font group on the Home tab. A drop down box will appear.
Step 3 — Select the desired colour (say blue) from the drop-down list.
To change the alignment for first paragraph, Kabir can follow the steps given below:
Step 1 — Select paragraph 1.
Step 2 — Click on the Align Left button available on the Paragraph group on the Home tab.
The color and alignment of Paragraph 1 will be changed.
In the same way, the other paragraphs can also be formatted by selecting different colors for different paragraphs. The other paragraphs can have different alignments such as Justified, Center or Right Align using the respective options.