
Which key is used to select a group of contiguous slides from a presentation?
- Shift
- Ctrl
- Alt
- Esc
Answer
Shift
Reason — Shift key is used to select a group of contiguous slides from a presentation.
Which view contains the thumbnails view of all slides in a presentation?
- Normal
- Notes Page
- Slide Sorter
- Slide Show
Answer
Slide Sorter
Reason — Slide Sorter view contains the thumbnails view of all slides in a presentation.
What is that piece of text, image or logo called, which is printed at the bottom of every slide in a presentation?
- Header
- Title
- Footer
- Subtitle
Answer
Footer
Reason — Footer is that piece of text, image or logo, which is printed at the bottom of every slide in a presentation.
Which option allows you to apply a gradient, texture or picture to your object?
- Fill effects
- Shapes
- Header
- Animation
Answer
Fill effects
Reason — Fill effects option allows us to apply a gradient, texture or picture to our object.
Which key is used while grouping multiple shapes in PowerPoint?
- Shift
- Esc
- Alt
- Enter
Answer
Shift
Reason — Shift key is used while grouping multiple shapes in PowerPoint.
Which effects are applied to an individual element on a single slide?
- Transition
- Animation
- Formatting
- Slide Design
Answer
Animation
Reason — Animation effects are applied to an individual element on a single slide.
Which option under the Add Animation button in the Animations tab is used to display how the object is leaving the screen?
- Exit
- Entrance
- Motion Paths
- Emphasis
Answer
Exit
Reason — Exit option under the Add Animation button in the Animations tab is used to display how the object is leaving the screen.
Which feature do you use to set a varying time for slides to be displayed before changing to the next slide?
- Rehearse Timings
- Duration
- Speed
- Mode
Answer
Rehearse Timings
Reason — Rehearse Timings feature is used to set a varying time for slides to be displayed before changing to the next slide.
In which group of Home tab, the New Slide button is present?
- Font
- Clipboard
- Editing
- Slides
Answer
Slides
Reason — The New Slide button is present in Slides group of Home tab.
On which tab, is the Layout button located?
- Slide Show
- View
- Home
- Insert
Answer
Home
Reason — The Layout button is located on the Home tab.
On which tab, do you find the Header & Footer option?
- View
- Insert
- Format
- Both 1 and 2
Answer
Insert
Reason — The Header & Footer option is found on the Insert tab.
Which view is used to work with a group of slides?
Answer
Slide Sorter View
Which key is used to select non-contiguous slides after selecting the first slide from a group?
Answer
Ctrl key
Which key is used to delete a slide?
Answer
Del key
Which tool is used to add text boxes to a slide?
Answer
Text box
What is that piece of text, image, or logo called, which is printed at the top of every slide in a presentation?
Answer
Header
Which drawing feature helps in drawing different shapes in PowerPoint?
Answer
Shapes
What is the file extension assigned to the recorded sound in PowerPoint?
Answer
.wav
What effects take place when one slide gives way to the next one in the presentation?
Answer
Slide Transitions
In which view, do we apply animation effects on slides?
Answer
Normal View
Which option in the Animation pane is used to change the order of animation effects?
Answer
Re-Order
Explain Slide Sorter view. Describe the steps to move a group of slides in this view.
Answer
Slide Sorter View contains the thumbnail view of all the slides in a presentation. We can use this view to work either with a group of slides or with a single slide.
We can follow the given steps to move a group of slides in this view:
Step 1 — Click on the slide that we want to move. A thick yellow border appears around it.
Step 2 — To select non-contiguous slides, click on the first slide and while pressing the Ctrl key, select the other desired slides one by one.
Step 3 — To select contiguous slides, click on the first slide and while pressing the Shift key, select the last slide in the group. This selects all the slides which come between the first and the last.
Step 4 — Drag the selected slides to the required place.
The selected slides will be moved to the required location.
Define the term Header.
Answer
Header is a little identifier that runs across the top of the slide. Whenever we need to repeat certain text or graphics on each slide, we can use Headers. They include information like page numbers, date, book or chapter titles, author name, slide show theme, etc.
Describe the steps to group Shapes in a slide.
Answer
The steps to group Shapes in a slide are as follows:
Step 1 — Draw all the shapes that are to be grouped.
Step 2 — Click on the Home tab in the Editing group and click on the Select button.
Step 3 — Choose the Select Objects option from the drop-down list.
Step 4 — Hold down the left mouse button to draw a box over the shapes. All the shapes in this box will be selected or press and hold Shift or Ctrl key while selecting the objects.
Step 5 — Right-click on the selected shapes that are to be grouped. A Shortcut menu appears.
Step 6 — Select the Group option. We will find three options i.e., Group, Ungroup, and Regroup. Click on the Group option.
The selected objects will be grouped together.
What do you mean by Slide Transition? Explain the steps to apply transition effect on a single slide.
Answer
A slide transition is the visual motion when one slide changes to the next during a presentation, like Wipe Down, Wipe Left, Wheel Clockwise, etc. These effects make our slide show lively and add dynamic flair to it.
The steps to apply transition effect on a single slide are as follows:
Step 1 — Select the slide on which we want to apply a transition. Click on the Transitions tab.
Step 2 — The 'Transition to This Slide' group appears on the Ribbon.
Step 3 — Click on the 'More' drop-down arrow to display all the transition effects. Click on any transition effect from the displayed choices. The current slide will display a preview of the selected effect.
Step 4 — Now select the 'Effect Options' button to select an effect for the chosen transition.
Step 5 — Click on the drop-down arrow of the Sound option in the Timing group and select any sound effect. Click on the Preview button present at the extreme left on the Ribbon. Observe its effect.
Step 6 — Specify the transition timing by entering the number of seconds or minutes in the 'Duration' box in the Timing group.
Step 7 — We can set our presentation to advance on its own and display each slide for a specific amount of time. To do so, uncheck the box next to the 'On Mouse Click', click on the 'After' checkbox and enter the amount of time for which we want to display the slide.
The effects will be applied on the current slide.
Describe the role of Animation in PowerPoint.
Answer
Animations make a presentation lively and impressive. They enable step-by-step content presentation with emphasis on key points allowing timing control and contribute to a polished, professional presentation.
Explain the concept of 'Rehearse Timings'.
Answer
Rehearse Timings feature helps us in finding out the time we would need to present a slide show. This option makes sure that our presentation fits within the certain time frame. We can set a varying time for slides to be displayed before changing to the next slide.
It works in the following way:
- Practice Run — When we choose the 'Rehearse Timings' option, PowerPoint starts a practice run of our presentation. As we advance through the slides, a timer records the time spent on each.
- Timing Adjustment — After completing the practice run, PowerPoint provides the option to review and adjust the timing for each slide. This feature is especially useful for ensuring that our presentation fits within a designated time frame.
- Automatic Slide Advancement — The timings we set during the rehearsal will be used to automatically advance the slides during the actual presentation. This ensures a smooth and well-timed delivery.
- Speaker Notes — 'Rehearse Timings' also allows us to add or edit speaker notes for each slide, helping us remember key points or cues during the presentation.
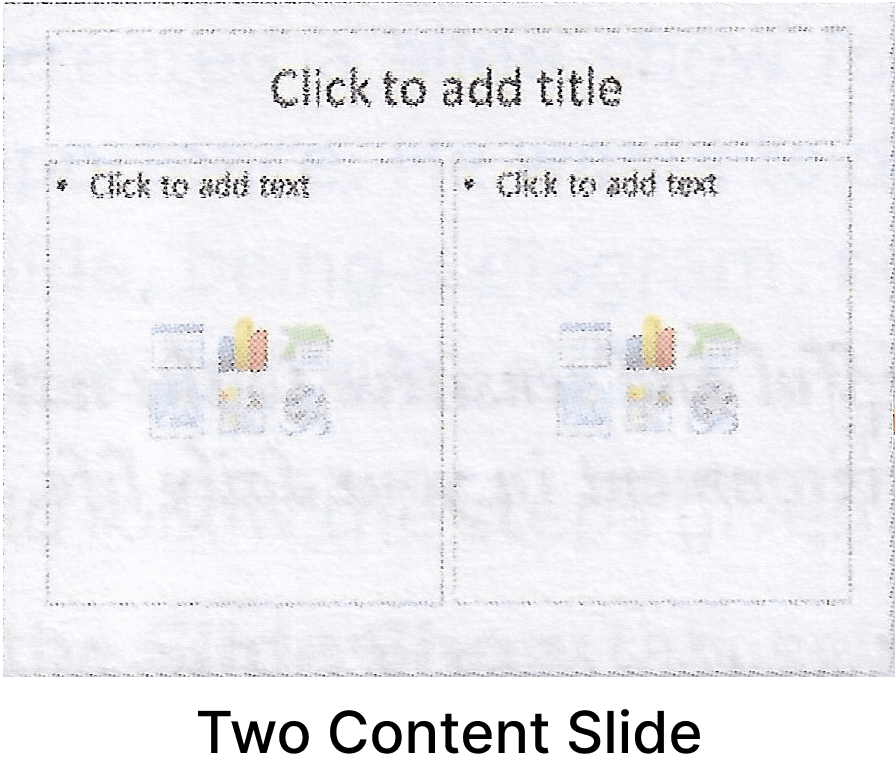
Your Computer teacher has shown you four slides which are depicting different slide formatting layouts. Identify these layouts and label the images.
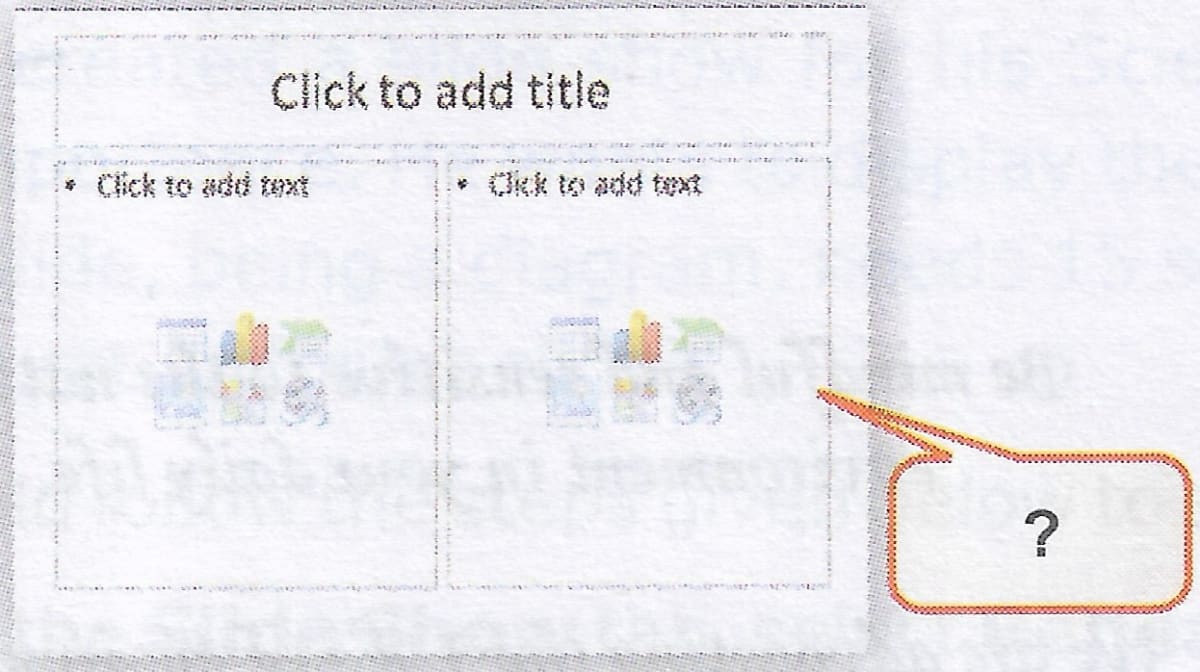

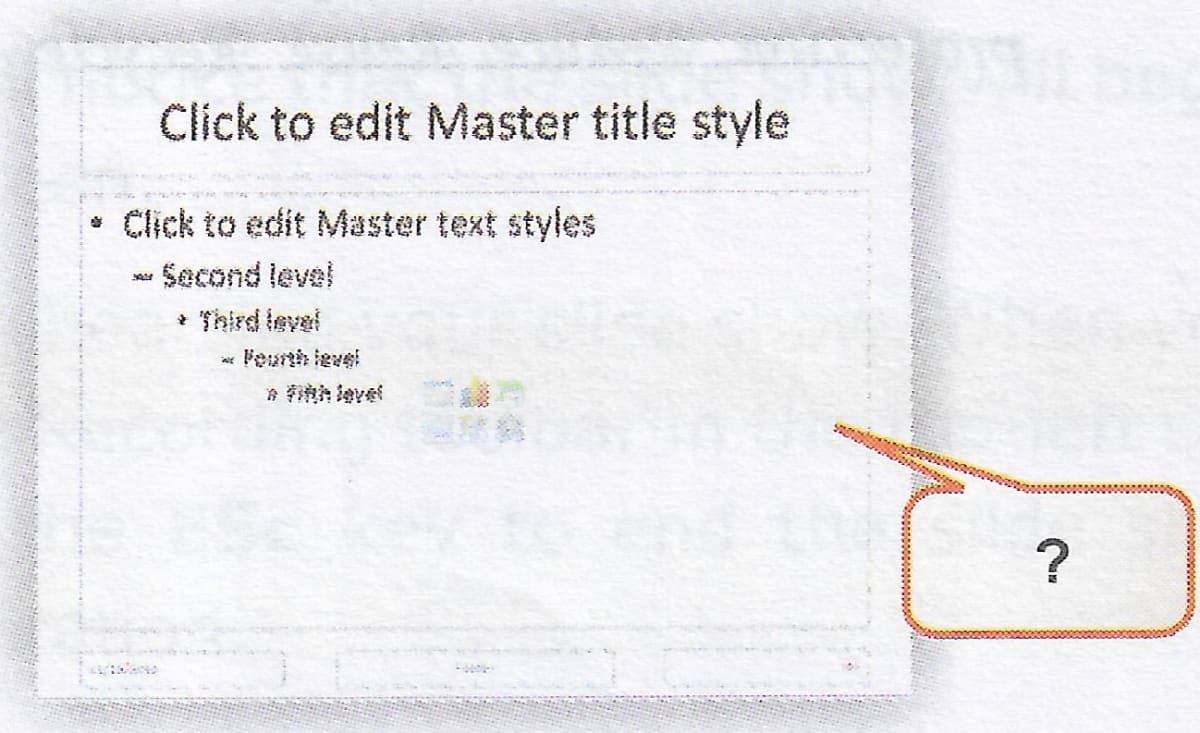
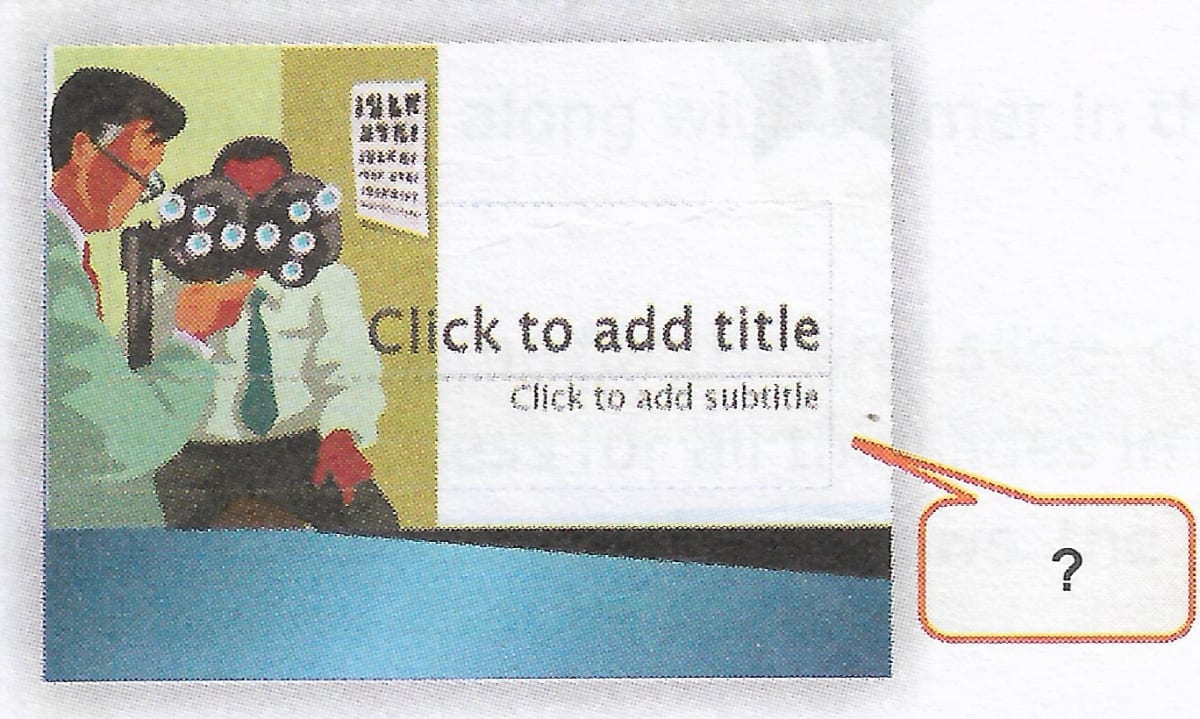
Answer
The labelled images of the layouts are given below:


Rohan has downloaded a presentation from the Internet, but he is not satisfied with the slides. He wants to copy and delete a few slides from the existing presentation. What steps should he follow to accomplish this task?
Answer
Rohan can follow the given steps to copy and delete slides:
Step 1 — Right-click on the slide that he wishes to copy.
Step 2 — Select the Copy option from the Context menu or select the Home tab and click on the Copy button in the Clipboard group or press the Ctrl + C key combination.
Step 3 — Right-click on the place where he wants to paste the slide and select the Paste Option from the Context menu or choose the Paste button on the Home tab in the Clipboard group or press Ctrl + V. The slide gets copied to the new location.
Step 4 — To delete a slide, right-click on the slide and select the Delete Slide option from the Context menu or press Del key.
Rohan can repeat the above steps to copy and delete slides as required.
Your teacher has given you an assignment to create a presentation with all the slides having different themes. Using which method you can apply the desired effects.
Answer
I can follow the given steps to create a presentation with all the slides having different themes:
Step 1 — Insert a blank slide in a presentation.
Step 2 — Click on Design tab.
Step 3 — From the Theme group, click on any theme that suits the purpose of the slide.
Step 4 — The theme will be applied on the slide.
The above steps can be repeated multiple times to add new slides (having different themes) to a presentation.
Your teacher has asked Simran to write a paragraph on 'Personality Development' on a blank slide. She has guided that Simran cannot apply any slide layout that has text boxes. Suggest her another method of adding text to the slide.
Answer
Simran can add a text box to the slide by following the given steps:
Step 1 — Select the blank slide in the presentation.
Step 2 — Click on Text Box icon present in the Text group on the Insert tab.
Step 3 — Click on the slide and drag the mouse to create a text box of any size. Release the mouse button once the desired text box size is achieved.
Step 4 — A cursor appears inside the text box that indicates to enter the text.
Simran can type the paragraph in the entered text box.
Sonal has created a presentation on 'Computer Technology'. She has forgotten the steps to add a slide number in the Footer area. Describe the required steps so that she can complete her presentation.
Answer
Sonal can add a slide number in the Footer area by following the given steps:
Step 1 — Click on the Insert tab > Text group and select 'Header & Footer'.
Step 2 — The Header and Footer dialog box appears. By default the Slide tab is selected.
Step 3 — Click on the Slide number checkbox to include it in the slide.
Step 4 — Click Apply to All.
The slide number will be added to the slides.