
BlueJ is an integrated development environment for Java. It was created for teaching Object Oriented programming to computer science students. It provides a simple beginner friendly interface to develop Java programs in an interactive visual environment. You can read more about BlueJ here.

This is the BlueJ main window. This is how it will look when you open it for the first time. In subsequent launches, it will open the project that you were working on previously.
Create a new BlueJ project
You start by creating a new project in BlueJ. A project is a collection of Java classes that constituent your software application. So, if you are building a student’s marks management application to record the marks of all the students in your class, that will be one project. While at the same time if you are building a cool game using Java then that will be a separate project.
To create a project, you go to the project menu and select new project. The new project dialog pops up. Give the name of the project as FirstJavaProgram. For location, navigate to the folder where you want to save your project. I will save it in C:\KnowledgeBoat\CompApps\BlueJ. Click on Select Folder then click on OK. BlueJ has created our FirstJavaProgram project. The name of the project is shown in the title bar.
Let’s go to the location we specified for our project.

Here you can see that a folder with our project’s name is created. This folder represents our FirstJavaProgram BlueJ project. Let’s open this folder.

The package.bluej file is the project file. It contains information related to the project and is used by BlueJ. The other file README.TXT is a text file provided by BlueJ to add documentation for our project.
BlueJ provides a handy way to work with the readme file. This icon here represents the ReadMe file that we saw just now in the project folder. You can open it by double clicking on it. Here you can add the details and additional notes about your project like project title, purpose of project, etc. This is just a template provided by BlueJ to help us document our project. You can change the contents of this ReadMe in any way you want.
Add a new class to the project
For adding a new class either you can click the New Class button, or you can go to the edit menu and select new class. This opens the new class dialog. Enter the name of your class. Remember we named our class HelloJava in our first program. I will enter the same name here. Select language as Java, class type as class and hit ok. Our newly created class is added to our project. Let’s switch to the folder containing our project.

HelloJava.java file contains the source code of our HelloJava class. Java compiler requires that a source file should use .java filename extension.
Coming back to the main window, did you notice these stripes present on our HelloJava class icon?
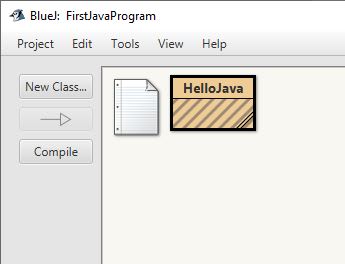
These stripes tell us that the class has not been compiled yet. Once we will compile the class, the stripes will go away. But before we can compile the class, we need to add some meaningful code there.
To add code you need to open the class which is done by double clicking on the class icon like this. You can also right click on the icon and select Open Editor option. That will also open the class. Both ways are equivalent, use whichever way you prefer.
The class already contains some code. This is the skeletal code of the class that’s generated automatically by BlueJ to save some amount of your time and effort. This default code is syntactically correct, it will compile but won’t do much. I will remove all this code and enter the code of our first program.
You can save the code by going to class and selecting save. Alternatively, you can use the shortcut ctrl+s to save the code. BlueJ automatically saves your work whenever you compile the code or when you close the editor so it is very unlikely that you might lose your changes even if you don’t explicitly save your work. Nevertheless, it is always a good idea to save your work explicitly.
Compile the code
You can compile the code of your class by clicking the compile button. You can also compile your class by right clicking on the class icon in the project window and selecting Compile. Both ways are equivalent, you can use whichever you like. Did you notice that the stripes on our HelloJava class icon are gone now? That’s because we have successfully compiled the class.
We just compiled our HelloWorld class. Lets go to the project folder and see what all files we have.

This file HelloJava.class is the Bytecode of our HelloJava class generated by the Java compiler. It will be executed by the JVM to run our program. We can take this HelloJava.class file to a machine running mac and it will run fine there too without needing any modifications.
Java file naming requirements
We have already seen that Java source code files need to have a filename extension .java. Another thing to notice here is that the name of the file containing source code of our class and our class name are same HelloJava. This is not a coincidence, unlike other programming languages where you can give any name to the source file, in Java the name of the source file is very important. The best practice in Java is to name the source code file with the same name as the class it contains. The reasoning behind this best practice is that no matter what you name your source code file, the .class file that is generated by the compiler will always have the class name as its file name and .class as its file extension. By giving the source code file the same name as the class it contains, you get a .java file and .class file with the same name. This helps to avoid confusion as to which is the source file related to a .class file.
Run the main method
With the class compiled, now is time we all have been waiting for. Finally, we will see our program running. Remember, we declared the main function static by writing the keyword static before its definition. Due to this we don’t need an object of class HelloJava to execute the main method. We will directly execute it from the class.
Right click on the class, select the main method. It asks for arguments of main method. This is the array of strings variable args that I asked you to ignore. So keeping my promise, we will not give anything here and just click ok. And there it is, the output of our program in the terminal window of BlueJ. It has printed the words Hello Java with 3 exclamation marks on the console window. Lets close the console window and execute the program again. Notice that the output of the previous execution is still there. By default, BlueJ will not clear it for the next execution. You can manually clear it by going to options and then selecting clear. You can also select the Clear screen at method call option. Then each execution will start with a blank screen and you don’t need to clear it manually everytime.
We have written, compiled and executed our first Java program. I will suggest you play around with BlueJ and try on your own, all the steps that I have shown here. The key to learning computer programming is practice and trying things on your own. The more you practice the more confident you will become.